Defining the Question
The SKLearn libraries have many different machine learning functions. They’re simple to use and quick. But can we live without them?
Exploring the Question
It’s important to understand the mechanics of these machine learning tools, not just how to deploy them but the math that is happening behind the scene. For this build week, we are going to look at KNearestNeighbors. KNN is both a classifier and a regressive model. Its also deceptively easy to understand. I’ve always had a bit of an easier time understanding classification problems, and since this model functions with both, it is one of my favorites. The assignment itself is to implement this algorithm using as few libraries as possible. For the base model, we will only be using numpy. To implement the code and test it, we will be using a few sklearn libraries simply for ease of deployment. Namely the ever popular iris dataset, and the train_test_split model. While the train_test function is very straight forward to replicate, there isn’t any necessity to do that here so we will be importing. The model will be fully capable of handling larger problems, though it will slow down a bit. I will consider adding caching to future explorations of this problem.
Understanding the Math
KNN is a supervised learning method, meaning that you need to provide it with labeled data. It takes measurements between x,y in the training data. The goal is to find a function h:X -> Y so that having an unknown observation can positively predict the identical output y. The way we find this relationship is with the Euclidean metric. Regression and classifications are resolved the same way; you state a number of neighbors that you are looking for, they act as defacto classifications. Given two arrays, the difference between each element is squared and then the square root is taken. The formula is shown:

Then x gets assigned to the class with the largest probability.
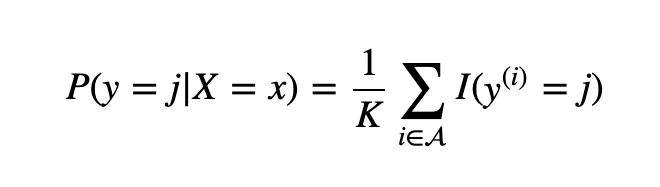
The best way to find the optimal K value is to repeat the calculations while iterating K along the odd numbers through a given range. Typically more than 50 neighbors gets messy. Once you have the optimal value, you can use that for further testing and training.
Building the Class
For this class, we will only be using the numpy library. While the KNN algorithm can be done with a series of functions, its much cleaner to simply put it in a class object to start. We will import numpy to start and then create the class for our KNearestNeighbors. The only value that we are starting with is k; its best to give this a default as part of best practice, but it can be changed when being used.
import numpy as np


class KNN:
    def __init__(self, k=3):
        """
        Our model is built around the number of neighbors we are looking to find.
        Let k equal the assumed number of classifications.
        """
        self.k = k
Our first method is to fit the data to the model. The method needs to ensure that the length of X and y are equal, otherwise we will have trouble down the road. X_train, y_train are what we will call this moving forward, and it will add these values to the class.
    def fit(self, X, y):
        """
        This method will fit training data to the model. We also assert that then length
        of the training data and targets are the same, otherwise the prediction method will break.
        """
        assert len(X) == len(y)
        self.X_train = X
        self.y_train = y
We need to create a method that will calculate the Euclidean metrics for two arrays. This can be simply done with the scipy.spatial library, but we are doing this raw. Your method needs to take in two values. These are converted to np.arrays. You then instantiate the distance at a 0 value, which is the default distance for two numbers of the same value. We then need to find the difference between the two values and square them. This gives us the absolute value and makes the differences act larger. Finally, we return the squared values for the distances.
    def distance(self, X1, X2):
        """
        The distance method finds the Euclidean distances between two relative points. There is
        a cleaner way to do this using the scipy.spatial library, but for the sake of completeness we have
        done this simple math here. The two arrays are compared, the differences between them are squared,
        and the square root is taken. The distance defaults to 0 for the case of a same value.
        """
        X1, X2 = np.array(X1), np.array(X2)
        distance = 0
        for i in range(len(X1) - 1):
            distance += (X1[i] - X2[i]) ** 2
        return np.sqrt(distance)
The most complicated method is the predict method. You want to take in your X_test arguments. We begin by instantiating an empty list for our sorted_outputs. Then we generate a for loop iterating over the length of X_test. Within this for loop you want to create two other empty lists, one for distances and one for neighbors. These will hold our distance calculations and run our predictions. We need to nest another for loop into this one, running the length of the X_train data that should already be fitted to the model. Each iteration should calculate a distance using that instance of the X_train data and the overall distance of the X_test data. This calculation is added to the distances list. It is very important to sort this list; sklearn approach this from a different angle but this was the most efficient way that I found. Once it is sorted, you want to slice the list down to the most relevant datapoints, which will be 0:k (k being the total number of neighbors you are solving for). Once this list is sorted, you then run another for loop for each instance in the sliced distances where it appends the y_train value of the instance to a list. This essentially gives you a list of possible neighbors. Once you take the max of that list, and append that value to your sorted outputs, you can return outputs and you will have a prediction on a given set of data.
    def predict(self, X_test):
        """
        Method that takes the fitted model and runs the X_test data comparing
        the Euclidean distances between each point. The values are sorted, and
        the highest values are stored to give a prediction on targets.
        """
        sorted_output = []
        for i in range(len(X_test)):
            distances = []
            neighbors = []
            for j in range(len(self.X_train)):
                dist = self.distance(self.X_train[j], X_test[i])
                distances.append([dist, j])
            distances.sort()
            distances = distances[0:self.k]
            for _, j in distances:
                neighbors.append(self.y_train[j])
            ans = max(neighbors)
            sorted_output.append(ans)

        return sorted_output
The final method for our KNN class is to give you the score for a given prediction. You need to ensure that your method accepts X_test and y_test arguments. It should create a list of predictions taken by running the X_test and running it through the predict method. The accuracy is returned by taking the predictions with the y_test and summing the values. You divide this by the length of the y_test to give you a percentage. Scoring only works if you have both the test values and their relative labels.
    def score(self, X_test, y_test):
        """
        This method takes the X_test and y_test, runs the data through the predict method.
        The number of successful guesses are summed and compared to the total number in the test data.
        """
        predictions = self.predict(X_test)
        return (predictions == y_test).sum() / len(y_test)
Operating the Class
Now that we have built the class, lets see how it performs. To begin, we will import our KNearestNeighbors model. I named the file that contained this knn.py, but you will need to point to your own file if you have a different naming convention. Also, import the iris dataset from sklearn as well as the train_test_split library. Replicating the train_test_split function isn’t difficult, but also unnecessary for this assignment. Finally, you’ll want to import the KNeighborsClassifier from sklearn for when we run our comparisons.
# This is the start of our notepad for testing the models. If you are pulling from my repo, you might need to change where the knn import points to.
from sklearn.neighbors import KNeighborsClassifier
from knn import *  # Pull in our model
from sklearn.datasets import load_iris  # Test data from the sklearn directory.
# This is an easy enough function to replicate, but this is cleaner.
from sklearn.model_selection import train_test_split
Load in the iris dataset and run it through train_test_split. I used a test value of 20%, but you can use a different figure if you like.
# We will load in the toy data, and split it up so that its in a useable format for our models.
iris = load_iris()
X_train, X_test, y_train, y_test = train_test_split(
    iris.data, iris.target, random_state=42, test_size=0.2)
Now we follow the formula for using machine learning processes in python. We first cast the class to a variable and set our number of neighbors. For this assignment I used 3.
# We instantiate my model which uses only numpy.
testing_neighbors = KNN(k=3)
We fit the model to our training data.
# We fit the model to the training data.
testing_neighbors.fit(X_train, y_train)
We test to see that our predictions processes are working. This test yields an array with True/False tags represented as 1 or 0 for successfully guessing the proper classification.
# We run some predictions using the test sample data.
prediction = testing_neighbors.predict(X_test)
Finally, we run our scoring method to see how well we did.
# We score the prediction accuracy.
rob_pred = testing_neighbors.score(X_test, y_test)
For ease of use, I ran this as a print() command. Our accuracy is 96.67%. This is pretty respectable. If you really dig into the code, the reason we are scoring less than 100% here is because the Euclidean distance method is using numpy and a slightly simpler equation. If we were to use the scipy.spatial library (as I did in other tests), the accuracy is 100%. I’m guessing its a rounding error.
print('The accuracy of the "No SKLEARN model" is :', rob_pred)
# Our model comes in at 96.667% accurate. The leakage here is by using a scratch Euclidean distance generator rather than the spatial one
# found in scipy. This is an acceptable difference for the scratch benefits.
Now we should compare how our simple model performs against the sklearn model. We instantiate.
# The process is the sample for the true model. First we instantiate it.
neigh = KNeighborsClassifier(n_neighbors=3)
We fit the training data to the model.
# Then we fit the training data.
neigh.fit(X_train, y_train)
And then we run the scoring method.
# Then we find its score and compare the too.
actual_preds = neigh.score(X_test, y_test)
The Sklearn model does a respectable 100% accurate breakdown. Ours is close enough to be acceptable for this example, but it just goes to show that sklearn is a very powerful series of tools and shouldn’t be overlooked.
print("The accuracy of the SKLEARN model is:", actual_preds)
# The sklearn model comes in with a 100% accuracy, which is understandable.
Comparison and Conclusion
Building your own machine learning algorithm from scratch isn’t that difficult, depending on the formula in question. The key is understanding the underlying math well enough to find code that replicates it. My big take-away here is that there are a plethora of resources available to assist with these sorts of tasks, and it isn’t as intimidating as it felt at the start. That said, sklearn is a powerhouse of functionality. Even if you weren’t going to use it for whatever reason, don’t ignore their source code. There are a lot of good things hidden in those libraries, and its all open source. If you hit a stumbling block in development, there isn’t any shame in referencing functional code and seeing where you are going wrong.
The repo for this build can be found here
I referenced the following works to construct the above code and tutorial: